
This course is committed to exposing students to the best, and newest communication technology created for debate. For this reason, we require that you register for an account with StreamYard.com. We have tested the capabilities of this website, and find that it is a great addition to the learning experience for a number of reasons. First, we find StreamYard’s user interface to be very user friendly. Second, we like the scheduling feature. Third, an account is free. And fourth, learning how to use StreamYard contributes to your digital literacy. In other words, learning new and varied ways to solve communication problems using multiple digital platforms is inherently valuable.
There are essentially three things you need to know in order to use StreamYard: sign up for an account, scheduling a debate, recording a debate. The following section will take you through each process. The only purpose of this lesson is to create an easy reference to a process that is freely available to the general public. We are in no way affiliated with StreamYard, and make no claims about specific outcomes. We are only using StreamYard for educational purposes, and do not endorse, nor participate in any of their promotions.
Getting Started
![]()
The front page of StreamYard is very straight forward. You can read about their project by scrolling down and seeing the reviews if you wish, but we recommend simply selecting the “Get Started” option. StreamYard has a sign up method for new accounts that does not require a password. You simply get an login code emailed to you. The benefit to this, other than not having to memorize yet another password, is that there is no issues of someone hacking into StreamYard and stealing a password that might be useful to someone with less than noble intentions. One you get your code, and login, you will need to set up a “destination.” StreamYard will automatically send your recording to any number of social media platforms, like FaceBook, YouTube, LinkedIn, Periscope and Twitch. This is where you enter your information for the YouTube channel that you set up in the previous learning unit. Once you have done that, you can schedule your first debate.
Schedule a debate
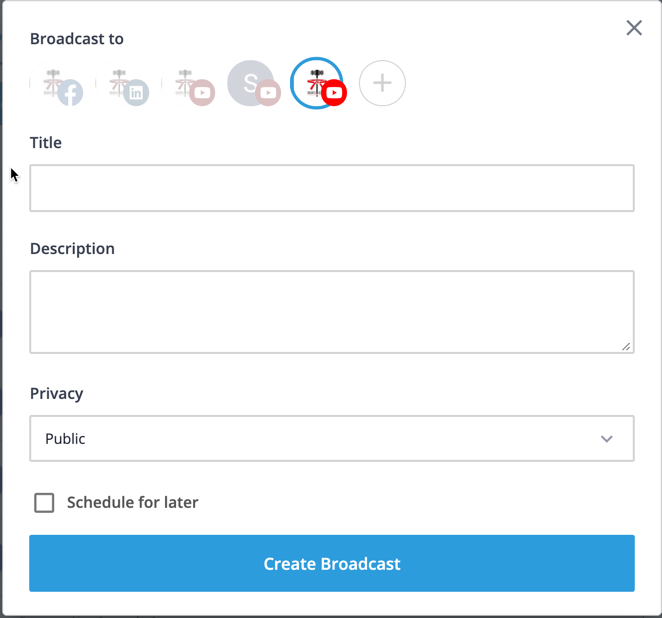
With a verified account, anybody can start a streaming debate. All debates for this course must feature only currently enrolled students. So, it is a good idea to get the email of the student you are going to debate before you start this process; you are going to need it later. You will also want to know the topic for the debate, and the side you are defending. Once you have these things, from your account select “create broadcast.” This will pull up the window shown here.
Next, enter the topic of the debate in the title, and the names of the debaters in the description, as well as their sides. Convention is that the affirmative is first, and the the negative is second. We also recommend that the affirmative debater be in charge of the setup for these debates. Set the privacy to “unlisted.” Please respect your classmate and only share the link for the debate with your opponent, and possibly with your instructor. If your debate is scheduled for a later time, you can easily set that time by checking the “Schedule for later” box. When all of the required information is entered, click the “Create Broadcast” button.
Your upcoming broadcast will be listed. It is a good idea to test out your equipment before the scheduled debate. You can chose to enter the broadcast studio at any time. From there, you will be take to a screen that tests your audio and video capabilities. Make sure that you can see yourself, and that your microphone is picking up sound. You have the ability to switch between cameras and microphones, if you have more than one, from this screen. In addition to verifying that your equipment works, make sure you are satisfied with the quality of the picture you see. Perhaps you will need to adjust your lighting or the position of the camera. Once you are satisfied, you are ready to record.
Recording a debate.
Once both debaters are at their respective devices at the scheduled time, and have entered the broadcast studio the debate can begin. When both of you are ready, the person that created the debate is in charge of the settings. You will need to add yourself, and your opponent to the stream. You should be able to see them below the viewing screen. Click on their image, and that will add them to the stream. You will see a number of screen layout settings to choose from. You may select whatever layout suits you.
IMPORTANT! You must click the “Go Live” button to record the debate! If is very frustrating to be halfway through a debate a realize that you have to start over because you weren’t recording. You know it is recording because it says you are live, and there is a clock counting up the time of your recording.
Once you feel that you have reached the end of the debate, either because time ran out, or you have no additional material to contribute, then the debate’s creator can select to end the debate at the top of the screen. Selecting this option ceases all recording, and uploads the debate for review and sharing. You can find the completed debates under the “Past Broadcasts” menu, but you have to select the “more” dropdown menu on the debate you want to share, and then choose to see it on YouTube. Copy the YouTube link to submit it for your assignments.
Using StreamYard for Cross-examination
StreamYard is not just good for whole debates, but also for remote cross-examinations for asynchronous debates. There are only two differences. First, you will want to include the fact that this is a cross-examination video in the description, not just the names of debaters. Remember to clarify if the video is the first or second cross-examination of the debate. Second, we consider it best practice if the debater in charge of asking questions also be in charge of creating the broadcast studio. This means, for the first cross-examination the negative debater should create the studio, and for the second cross-examination the affirmative debater should create it.
We are confident that StreamYard is easy enough for anybody to use, and it is particularly suited for managing debates online. They come out with additional features all the time, so feel free to test them out and incorporate them into your debate, if you feel it is appropriate. We look forward to seeing your results.