There has been a rapid and significant increase in the amount of technology designed for human communication over the last twenty years, and the importance of video communication in particular has only increased since the pandemic. People are going to have to adapt to this new reality if they want to be successful. It is incredibly likely that you will have to give an interview, or presentation online. Many speech and debate courses still teach students how to speak in front of a live audience, and have yet to address contemporary communication needs. This lesson is going to offer some advice for how to meet the technology requirements that come with online video communication. We address four facets of technology that all contribute to managing and improving your online video presence: video sharing applications, cameras, lights, and audio.
Video Sharing Applications.
In this course, you will have the opportunity to practice and refine your public speaking skills through recorded speeches. To facilitate this process, we will be using Yoodli, an AI-powered speech coaching platform. Yoodli allows you to record your speeches, receive automated feedback on various aspects of your delivery, and easily share your recordings with your instructor for evaluation and guidance.
You will receive an email invitation from ProtoCommunications to create your Yoodli account. Please follow the instructions in the email to set up your account. If you do not receive the invitation email within a few days of enrolling in the course, please contact your instructor. Once your account is set up, familiarize yourself with the Yoodli platform and its features. As a student in this course, you will have access to unlimited Yoodli recordings for the duration of the semester, a $240 value provided by ProtoCommunications.
When you log in to Yoodli, you will see a “Practice” button on the main screen. Clicking this button will give you several options for practicing your speaking skills:
- Roleplay: This option allows you to choose from a variety of pre-written scenarios, such as job interviews or sales pitches, to practice your impromptu speaking abilities.
- Presentation: Select this option when you want to practice a prepared speech or presentation. You can either upload a script or outline, or simply speak from memory.
- Interview: This feature is designed to help you prepare for job interviews or other question-and-answer scenarios. You can choose from a list of common interview questions or input your own.
- Upload Video: If you have already recorded a speech or presentation using another platform, you can upload the video file to Yoodli for analysis and feedback.
No matter which practice option you choose, Yoodli will analyze your speech and provide detailed feedback on various aspects of your delivery, including verbal fillers, speaking rate, eye contact, and more. Use this feedback to identify areas for improvement and track your progress over time.
When a speech assignment is due, use Yoodli to record your presentation. Make sure you have a quiet space with good lighting and a clear background. Before recording, test your microphone and camera to ensure they are working properly. When you are ready, start the recording and deliver your speech as if you were presenting to a live audience. After you finish recording, Yoodli will process your video and provide automated feedback on various aspects of your delivery, such as verbal fillers, speaking rate, and eye contact.
Cameras
The ubiquity of cameras is rapidly changing our society. Online communication courses wouldn’t be possible if not for the widespread access to video recording. The result is a wide selection of options that you have when deciding to record, each with benefits and drawbacks.
Traditional video recorders have several settings and features that allow you to customize the look of your recording. Some of the benefits include the ability to attach the camera to a stable tripod, the ability to zoom in and out to frame your shot, and the ability to add devices like remotes and microphones to add even greater quality to the recording. The biggest drawback to using a video camera is undoubtedly the cost, but if you have access to one, then you should seriously consider using it for your speeches. You should note that, unless you know how to connect your camera to your computer, this will not be an option for live streaming assignments.
It is much more likely that you have access to a smartphone with video recording capabilities. This is sufficient for the purposes of this online communication course, but it is good to be aware of the shortcomings of recording with your phone. One drawback is that you need to think about how to place your phone while recording. There are specialty stands that are made for recording with your phone, but most people don’t have one, and settle on propping up their phone on a flat surface. The most common outcome is an “upshot” of the speaker, which is rarely flattering. The alternative is to hold the phone while speaking, which gives the appearance of a selfie, but also occupies your hand while speaking. This is not necessarily a bad thing, but requires coordination, especially if you are using notes during your speech. Of course, lack of coordination may also result in a shaky video.
The third most common option is to simply use the camera built into a computer, or webcam. These cameras have become standard on laptops and are fairly inexpensive to purchase for a desktop. The benefit is that they are easy to stabilize, and you also have a computer screen nearby for any evidence or notes that you want to reference during the speech. The computer screen, though, is also a drawback because it is easy to read your information off the screen, rather than participate in an engaging delivery. Speakers should practice spending most of the recording time looking directly into the camera.
Lighting
Even for amateur producers of video content, lighting is a critical element for making good images. If you have the ability to shoot in natural outdoor light, that is ideal, and it’s free! But for many people, shooting outdoors is inconvenient because they do not have availability during the day for recording speeches, or there is too much noise outside for clear audio. If you find yourself in this situation, then you will need to think about how to set up lighting for the best shot possible.
Be sure to avoid the mistake of having too much backlighting. This is when the source of light comes primarily from behind the subject. The result is that the person on camera looks like a talking silhouette. Instead, follow a standard three-point lighting configuration. The purpose of the three lights is to avoid distracting shadows on the object. Generally, a standard three-point lighting configuration requires one light on either side of the subject, angled 45° from the camera, and one (dimmer) light behind the subject. Focused light is the best, but if all you have are lamps that you can arrange, then something is better than nothing. Be careful about using fluorescent light, because the camera will accentuate any flickering during recording.
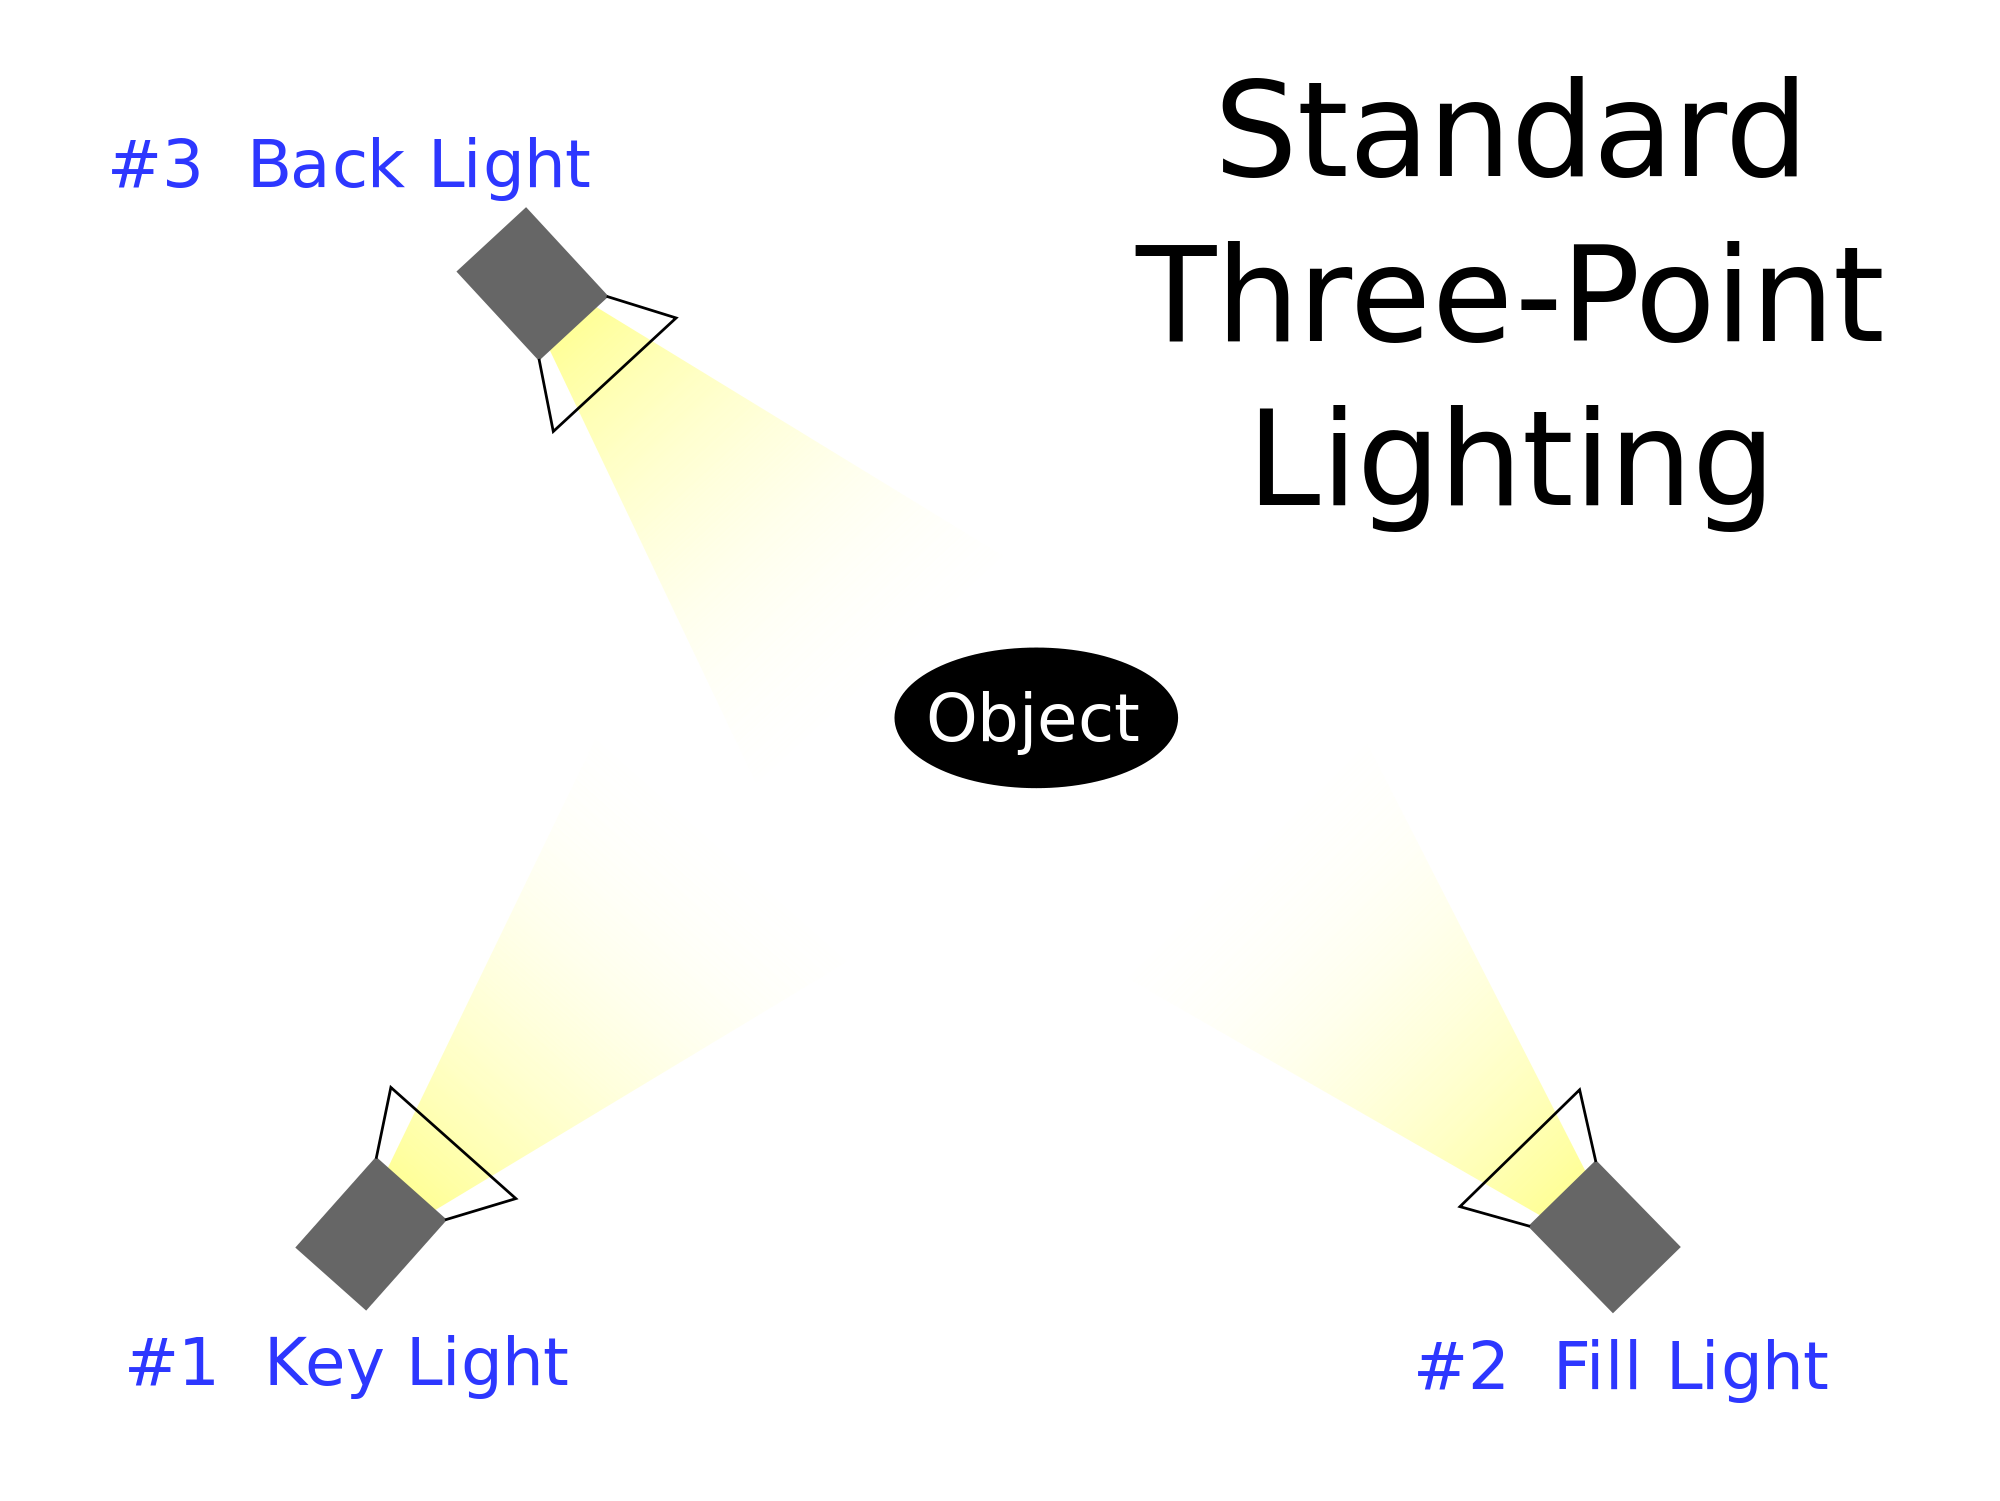
Three-point Lighting Setup
If you don’t have good sources of light, there are some creative alternatives. The easiest way to meet your lighting needs is to use natural light. The limitations to this approach are weather and time of day. But, if you are able to schedule your time to record on a sunny day, there is no equal to natural light. This doesn’t necessarily mean that you need to go outside, especially if you cannot control the sound around you. You can utilize natural light by simply setting up your shot in front of an unobstructed window. We have even seen setups where students attach their phone to a clothes hanger, and hang it in front of a sunny window.
Audio
Sound is easily the most overlooked factor in producing a quality video, but there is a reason why some of the most famous YouTubers in the world are always on screen talking into a large microphone, or are wearing a headset with a built-in mic. Take the time to not only consider what audio equipment you are going to use, but also to test out your equipment beforehand. There are a few options to consider when thinking about how to record the audio for your videos.
Practically all video recording devices, whether they are laptops, smartphones, or video cameras, have a built-in audio recorder that syncs with your video when recording. While this is convenient, there are some common drawbacks. One is that the built-in device isn’t always of the highest quality, so you have to place the microphone fairly close to the object, which then affects the framing of your shot. Another is that if you are recording outside, any wind that might occur could be recorded, resulting in a loud static-like sound. Still, if you find that your built-in device is adequate for the purposes of asynchronous debate, consider yourself lucky to use it.
If your built-in device proves inadequate, a fairly inexpensive solution is to use a headset with microphone combination. These have become increasingly popular with gamers, as well as YouTube commentators. The benefits are that the microphone can be placed close to the speaker’s mouth to pick up every word, as well as avoid a lot of the ambient noise in the room, or other echoes. These headsets are somewhat limited because they don’t necessarily plug into video cameras or phones, but work well with computers that have cameras installed. Additionally, you have to deal with the visual of speaking with the apparatus on your head.
A third option is to purchase a traditional microphone that plugs directly into your video recorder. This might get costly if you are not careful, but the quality is unparalleled. These microphones still need to be placed close to the speaker’s mouth, so it is likely that it will be in the shot while you are speaking. Be careful about breathing into the microphone, as it will cause distracting “pops” in the recording.
If you want to participate in online communication courses, these technological considerations are unavoidable. Unfortunately, these requirements may prove to be a bigger burden for some than for others. Be on the lookout for creative solutions. People regularly share new, and innovative ways to participate online. We are constantly searching for ways to improve student access to learning environments, but we are confident that the vast majority of students have the ability to meet these technological needs.